
As an enterprise using VMware Cloud Services, you can set up federation with your corporate domain. Federating your corporate domain allows you to use your organization’s single sign-on and identity source to sign in to VMware Cloud Services. You can also set up multi-factor authentication as part of federation access policy settings.
Federated identity management allows you to control authentication to your organization and its services by assigning organization and service roles to your enterprise groups.
Set up a federated identity with the VMware Identity Manager service and the VMware Identity Manager connector, which VMWare provide at no additional charge. The following are the required high-level steps.
- Download the VMware Identity Manager (vIDM) connector and configure it for user attributes and group sync from your corporate identity store. Note that only the VMware Identity Manager Connector for Windows is supported.
- Configure your corporate identity provider instance using the VMware Identity Manager service.
- Register your corporate domain.
This series of blogs will demonstrate how to complete customer end setup of the Federated Identity Management for VMC on AWS.
- Install and set up the vIDM connector. VMware Cloud on AWS has begun to support Connector-less Enterprise Federation Setup since Oct 2021. Installing a vIDM connector is not always required.
- Use Case 1: authenticate the users with On-prem Active Directory; (https://davidwzhang.com/2019/07/31/setting-up-federated-identity-management-for-vmc-on-aws-authentication-with-active-directory)
- Use Case 2: authenticate the users with third party IDP Okta (https://davidwzhang.com/2019/07/31/setting-up-federated-identity-management-for-vmc-on-aws-authentication-with-okta-idp/)
- Use Case 3: authenticate users with Active Directory Federation Services ( https://davidwzhang.com/2019/12/04/setting-up-federated-identity-management-for-vmc-on-aws-authentication-with-adfs/ )
- Use Case 4: authenticate users with Azure AD (https://davidwzhang.com/2019/12/11/setting-up-federated-identity-management-for-vmc-on-aws-authentication-with-azure-ad/)
As the 1st blog of this series, I will show you how to install the vIDM connector (version 19.03) on Windows 2012 R2 server and how we achieve the HA for vIDM connector.
Prerequisite
- a vIDM SaaS tenant. If you don’t have one, please contact VMware customer success representative.
- a Window Server (Windows 2008 R2, Windows 2012, Windows 2012 R2 or Windows 2016).
- Open the firewall rules for communication from Windows Server to domain controllers and vIDM tenant on port 443.
- vIDM connector for Windows installation package. The latest version of vIDM connector is shown below.

Installation
Log in to the Windows 2012 R2 server and start the installation:

Click Yes in the “User Account Control” window.
Note the installation package will install the latest major JRE version on on the connector windows server if the JRE has not been installed yet.

The installation process is loading the Installation Wizard.

Click Next in the Installation Wizard window.

Accept the License Agreement as below:

Accept the default of installation destination folder and click Next;

Click Next and leave the “Are you migrating your Connector” box unchecked.

Accept the pop-up hostname and default port for this connector.

As the purpose of VMware Cloud federated identity management, please don’t run the Connector service as domain user account. So leave this “Would you like to run the Connector service as a domain user account?” option box unchecked and click Next.

Click Yes in the pop-up window to confirm from the previous step.

Click Install to begin the installation.

Wait for a few minutes, the installation has completed successfully.

Click Finish. A new window will pop up, which suggests the Connector appliance management URL as below .

Click Yes. The browser is opened and will redirect to https://vidmconn01.lab.local:8443. Accept the alert of security certificate and continue to this website.

In the VMware Identity Manager Appliance Setup wizard, click Continue.
Note: Don’t use Internet Explorer when running the wizard. There is a known bug with IE.

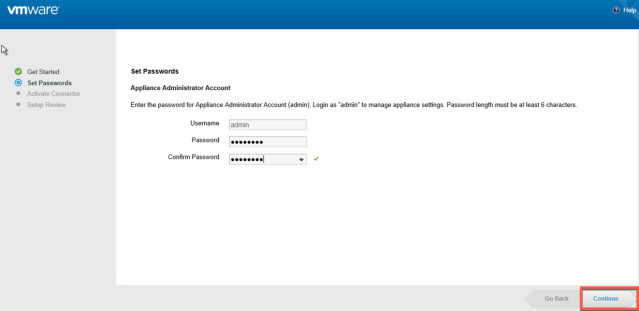
Set passwords for appliance application admin account and click Continue.
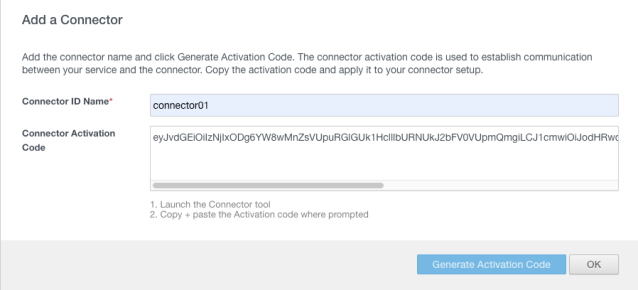
Now go to the vIDM tenant, in the tab of Identity & Access Management, click Add Connector.

Type in Connector ID Name and Click “Generate Activation Code”.

Copy the generated activation code and go back to the Connector setup wizard.
Copy the activation code into the Activate Connector Window and click Continue.
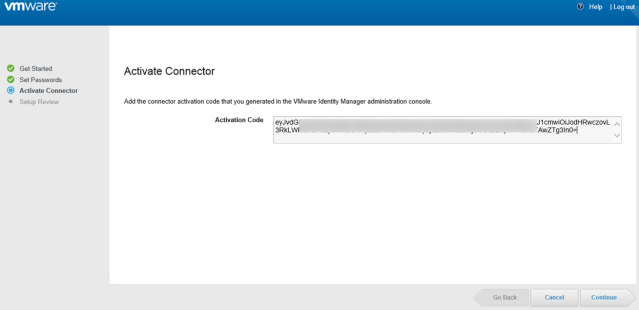
Wait for a few minutes then the connector will be activated.

Note: sometimes a 404 error will pop up like the below. As my experience, it is a false alert for Windows 2012 R2. Don’t worry about it.

In VMware Identity Manager tenant, the newly installed connector will show up as below:

Setup
Now it is time to set up our connector for user sync.
Step 1: Add Directory
Click Add Directory and select “Add Active Directory over LDAP/IWA”.

Type in “Directory Name”, select “Active Directory over LDAP” and use this directory for user sync and authentication. In the “Directory Search Attribute”, I prefer to use UserPrincipalName than sAMAccountName as the UserPrincipalName option will work for all Federated Identity management use cases, e.g. integration with Active Directory Federation Service and 3rd Party IDP.

Then provide the required Bind User Details and click “Save & Next”

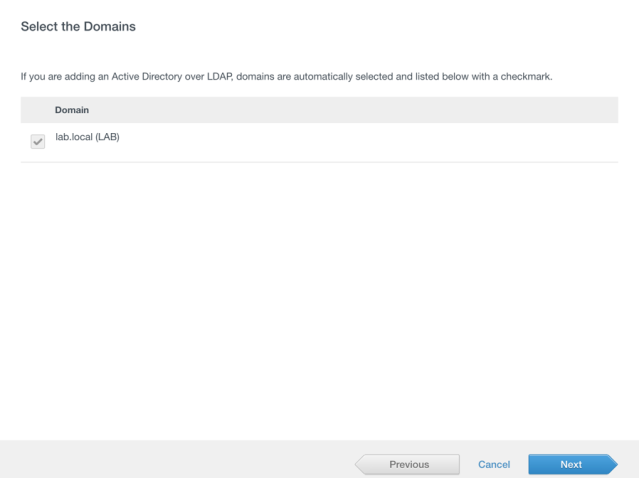
After a few minutes, the domain will pop up. Click Next.
In the Map User Attributes window, accept the setup and click Next

Type in the group DNs and click “Find Groups”.

Click the “0 of 23” under the column “Groups to sync”.

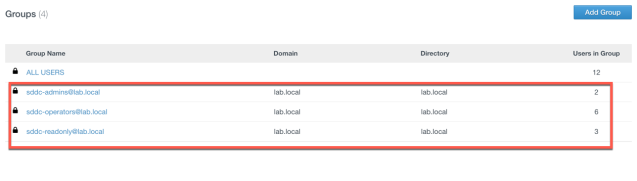
Select 3 user groups which need to be synced and click Save.

Click Next.

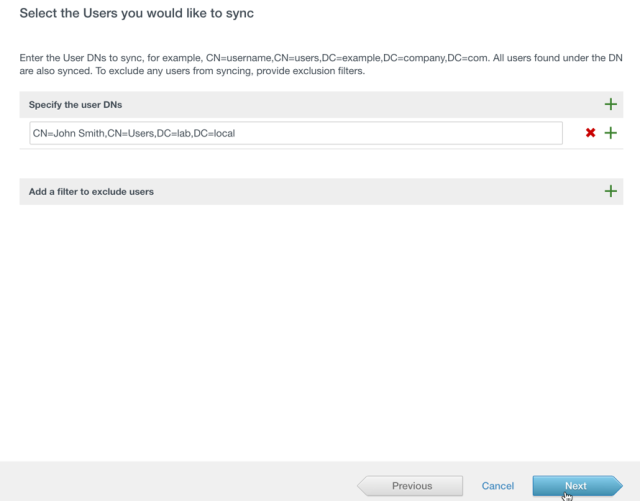
Accept the default setting in the “Select the Users you would like to sync” window and click Next.
In the Review window, click “Sync Directory”

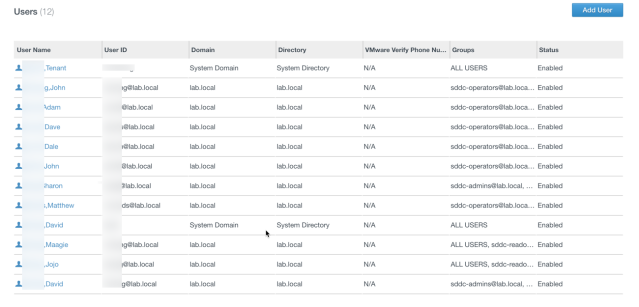
Now it is time to verify that the synced users and groups in VIDM tenant. Go to the “User & Groups” tab. You can see we have 10 users and 3 groups that are synced from lab.local directory.
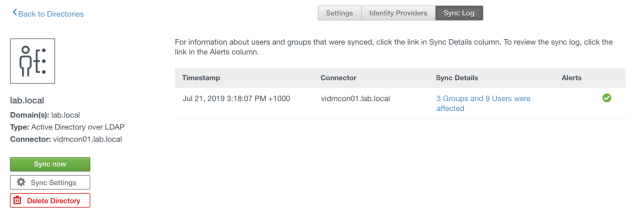
You can find the sync log within the configured directory.
Now the basic set up of vIDM connector has been completed.
Connector HA
A single VMware Identity manager is considered as a single point of failure in an enterprise environment. To achieve the high availability of connectors, just install an extra one or multiple connectors, the installation of an extra connector is exactly same as installing the 1st connector. Here, the second connector is installed on another Windows 2012 R2 server vidmcon02.lab.local. After the installation is completed, the activation procedure of the connector is the same as well.
Now 2 connectors will show up in the vIDM tenant.

Go to the Built-in identity provider and add the second connector.

Type in the Bind User Password and click “Add Connector”

Then the second connector is added successfully.
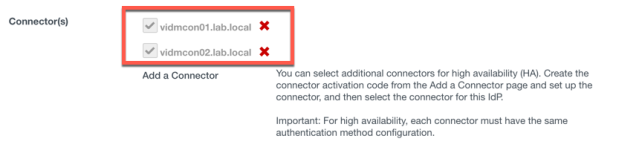
Now there are 2 connectors associated with the Built-in Identity Provider.

Please note connector HA is only for user authentication in version 19.03. Directory or user sync can only be enabled on one connector at a time. In the event of a connector instance failure, authentication is handled automatically by another connector instance. However, for directory sync, you must modify the directory settings in the VMware Identity Manager service to use another connector instance like the below.

Thank you very much for reading!

Pingback: Setting Up Federated Identity Management for VMC on AWS – Authentication with Okta IdP – InsidePacket
Pingback: Setting Up Federated Identity Management for VMC on AWS – Authentication with Active Directory – InsidePacket
Pingback: Setting Up Federated Identity Management for VMC on AWS – Authentication with ADFS – InsidePacket
Pingback: Setting Up Federated Identity Management for VMC on AWS – Authentication with Azure AD – InsidePacket
The lifecycle management of the guest identities, does the feature ensure the lifecycle management of the guest identities is kept in sync with guest’s original source of identity provider?
LikeLike
Hi Nikhil, yes. The connector will help to ensure the sync between on-premise AD and vIDM tenant.
LikeLike
Pingback: Setting Up Federated Identity Management for VMC on AWS – Authentication with PingOne – InsidePacket